Windows
Originally developed in Windows and for Windows users in mind.
Prerequisite: You already have a “virtual audio cable” installed
- Extract to a path without spaces. Avoid placing in paths like “Program Files”.
- Place the given license file in the same directory as decoder (exe or jar)
- Make sure you have a JDK that includes the JavaFX package.
(OpenJDK v1.8 is the last to inlcude this package by default)
My advice is to download JDK11 that already includes this like the
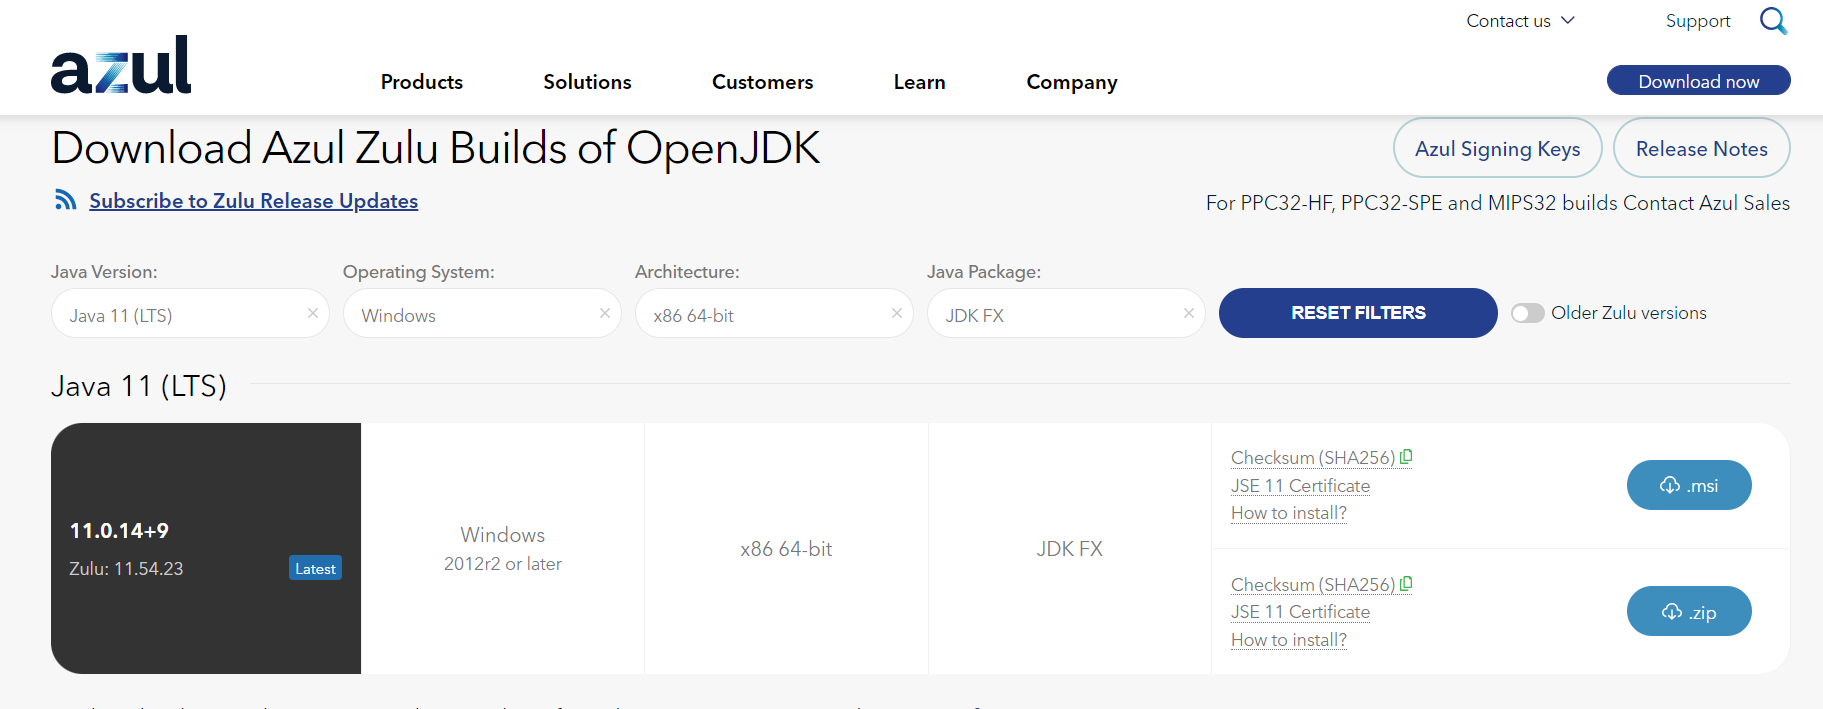
Azul Zulu Builds of OpenJDK (scroll to bottom of page)
Make sure that “JDK FX” is selected under “Java Package”.
WARNING: Select 32 or 64 bit according to your architecture.
- select the MSI download link…
- during install, select the usually unselected option to “Add to Java PATH“
- (optional) verify correct installation by opening a NEW cmd (terminal) window and type “java -version“. You should see something like the following:

- Start your SDR software and configure it appropriately. (NCS frequency for your region, USB modulation, gain for max SNR)
- Start the decoder by doubleclicking on decoder (exe or jar)
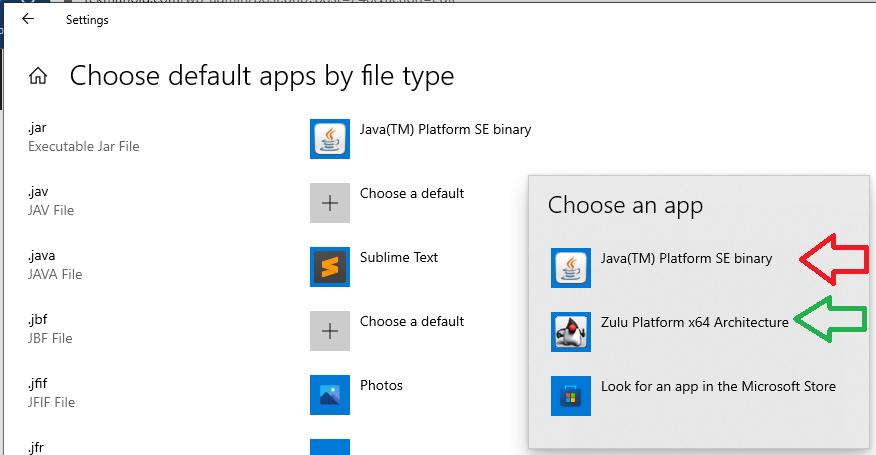
If you get a “JNI error” or “Java Exception” then it could be that an older JRE is trying to launch this Java (.jar) file.
You can select through Windows which Java gets selected to run your file automatically in a window that looks like this:
- Select the (virtual) soundcard to be used from “Settings” / “Soundcard”
- Restart the decoder to make sure the changes take effect.

Ubuntu/Debian
The Tekmanoid decoder was originally developed for Windows. Since it is written in Java though, multiplatform by nature, it could run under other platforms too.
What follows is the recommended set of instructions for running the program under Ubuntu. You can deviate from the list of course, and the numbering is provided more like a general guideline. The following commands have been verified under a Ubuntu 20.04 LTS installation.
- Extract to a path without spaces. Avoid placing in paths like “Program Files”.
- Place the given license file in the same directory as decoder.exe
- Optional step. Change the extension from decoder.exe to decoder.jar
- The program needs the JavaFX package to run.
Since JDK 1.9 this package is no longer delivered in the JDK and has to be downloaded separately. To simplify things we will use
JDK11 (LTS) provided by Azul Zulu with JavaFX support - You can have more than one JDK if desired and you can select the desired one as default at any time. The following commands set the newly installed JDK as default.
> sudo update-alternatives --install "/usr/bin/java" "java"” 1"/usr/lib/jvm/zulu-fx-11-amd64/bin/java> sudo update-alternatives --install "/usr/bin/javac" "javac"1"/usr/lib/jvm/zulu-fx-11-amd64/bin/javac"> sudo update-alternatives --config java - Now verify that the correct version is exposed by the system:
> java -version
openjdk version "11.0.14" 2022-01-18 LTS
OpenJDK Runtime Environment Zulu11.54+23-CA (build 11.0.14+9-LTS)
OpenJDK 64-Bit Server VM Zulu11.54+23-CA (build 11.0.14+9-LTS, mixed mode) - Install an SDR on your Ubuntu machine.
a. For quickly verifying the setup you can use Gqrx or CubicSDR.
Both can be easily be installed through Ubuntu’s Synaptic Package Manager
b. For a more advanced program you can install SDR++ - Add a virtual sink. This is the equivalent of installing VirtualAudioCable on Windows. It will create an audio loopback interface for the soundcard. This will be used to redirect the audio generated by the SDR back into the soundcard to be picked up and processed by the Tekmanoid decoder.
>sudo modprobe snd_aloop - Start your SDR software and configure it appropriately. (NCS frequency for your region, USB modulation, gain for max SNR). Send the audio from the SDR software to “Built-in Analog Stereo” (the loopback).
- Start the Tekmanoid decoder
>java -jar decoder.exe(or decoder.jar depending on step 1)
Select the loopback device soundcard from Tekmanoid’s menu “Settings” / “Soundcard”. If everything is successful you should see the program pop up. - Restart the Tekmanoid decoder to make sure that the settings have taken effect.
- Hit the [ON] button on the Tekmanoid decoder and enjoy.
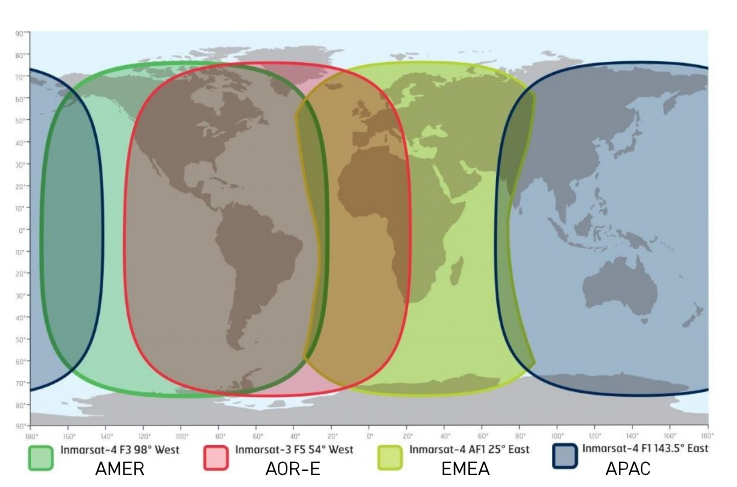
Sat footprints & frequencies
Use the website www.dishpointer.com to get a first estimate of where to point the antenna.

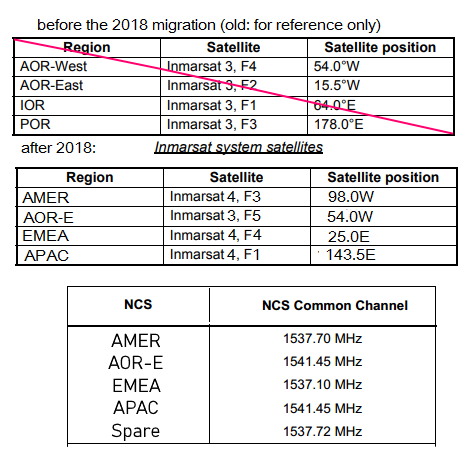
Below are the NCS frequencies for the various satellites/regions.
The first you should attempt to tune for your region.
